Focus XD
Thank you
Thank you for choosing Dynaudio Focus XD loudspeakers. Every Focus XD model features advanced Dynaudio loudspeaker technology that turns listening to music into an impressive experience. This technology results from many years of intense research and development, the highest quality standards in production, and Dynaudio’s enduring passion for musical truth.
Each Focus XD loudspeaker is constructed by Dynaudio’s master craftsmen in Denmark to these high standards of quality. To realize the highest sound quality from the Focus XD models, some areas should be addressed, as will be explored on the following pages.
By considering the tips and suggestions, you will achieve the maximum performance and enjoyment of the Focus XD and its advanced musical capabilities for a long time to come.
We hope you have a great time listening to your favourite music.
Dynaudio
Safety instructions

Dangerous electrical voltage
If the loudspeakers are connected to the mains voltage, a dangerous electrical voltage is present inside the speakers.
- Never open the loudspeaker housing.
- Do not operate defective loudspeakers and disconnect defective loudspeakers from the mains voltage. Please contact your Dynaudio distributor if you have any problems. Distributor addresses can be found in the Internet at www.dynaudio.com.
- Use the supplied power cable to connect the loudspeakers to the mains voltage. Make sure that the power supply cable is not damaged; exchange it for a new one if it has been damaged.
High sound pressure levels
Listening to high sound pressure levels over a longer period of time may harm your hearing.
- To avoid auditory effect, do not listen to high sound levels over a longer period of time.
About this guide
Used expressions and symbols
In this operating manual following signs and symbols are used:
ATTENTION: Indicates a hazard that could result in damage or destruction of the product.
The exclamation point within an equilateral triangle is intended to alert the user to the presence of important operating and maintenance (servicing) instructions in the literature accompanying the product.
CAUTION
Indicates (in combination with a safety sign) a potentially hazardous situation which, if not avoided, could result in minor or moderate injury or damage to equipment.
WARNING
Indicates a hazard that could result in death or severe injury.
The arrow will identify steps to be performed. Please follow the instructions carefully.
Always make sure to follow the instructions given in these passages.
- Multiple steps that should be performed consecutively are numbered.
- Please follow these instructions carefully.
Unpacking and Setup
Scope of delivery


- 2 Focus XD loudspeakers (60 XD, 30 XD, or 20 XD)
- 2 Focus XD loudspeaker cloth covers (not shown)
- 1 remote control
- 2 power cables (country-specific version)
- 1 first time setup manual (quick guide for installation, not shown).
Unpacking
After unpacking, make sure the system is complete and check the device and all accessories for transport damage. Transport damage may be expected if the packaging is already severely harmed. Do not attempt to commission a damaged device. If the contents are incomplete or damaged, please contact your Dynaudio distributor.
Distributor addresses can be found in the Internet at www.dynaudio.com.
Packaging material
The packaging has been designed so that it may be reused if it was not damaged during transport. Keep the packaging and use the original packaging for all further transport.
Disposal
Disposal of used electrical and electronic equipment (applicable in European countries with separate collection systems for this equipment).
This symbol on the product or its packaging indicates that the product may not be treated as household waste. Instead it must be handed over to the applicable collection point for the recycling of electrical and electronic equipment. By ensuring this product is disposed of correctly, you will help prevent potential negative consequences for the environment and human health. The recycling of materials helps to conserve natural resources.
For more detailed information on recycling this product, please contact your local authority, community waste disposal office, or the shop where you purchased the product.
CAUTION
Spikes with sharp peaks
The floor-standing Focus XD loudspeakers allow for setup with spikes. The sharp peaks of the spikes may cause injuries and damage sensitive surfaces like hardwood flooring or tile.
- Be careful when handling the loudspeakers.
- Place plates between the spikes and the surface to protect the underlying surface.
ATTENTION
Light, heat, electromagnetic radiation
Direct sunlight or excessive brightness can affect the colour of your loudspeakers’ natural wood veneer. Built-up heat can lead to overheating. Electromagnetic radiation of different devices can lead to mutual impairment to functions.
- Avoid placing the device in very warm, cold, or humid environments.
- To maintain the aesthetic quality of your loudspeakers for the long term, placement in light-intensive, sunny environments should be avoided.
- Please ensure sufficient ventilation and observe the required distances around the loudspeakers.
- Do not place the loudspeakers near devices with strong electromagnetic radiation or devices that could be destroyed or damaged by magnetic fields.
Floor-standing loudspeaker setup
The floor-standing Focus XD loudspeaker features a special base construction, which offers both an ideal performance and mechanical basis. The spikes screwed into the end of the feet on the base can be unscrewed and their height adjusted, to adapt to uneven floors. When the spikes are retracted, the loudspeakers stand on rubber feet. These stabilize the cabinet on an extremely small contact area, and therefore prevent any wobbling while offering optimal resonance control.
The best setup variant depends on the nature of the room and the floor in particular.
Your Dynaudio distributor would be happy to assist you during setup.
Compact loudspeaker setup
The compact Focus models are designed to offer exceptional performance while taking up minimal space. Due to adverse effects to the sound quality, compact loudspeakers should not be placed on the floor. The mini-monitors will realize their optimum performance when used in conjunction with a stand to position them at the proper height while absorbing any resonance. Please contact your Dynaudio distributor for more details.
Due to its dimensions, you can also place the loudspeaker on a ledge or shelf or on top of furniture. To avoid the possibility of any negative influence on sound quality, make sure to utilize a stable surface offering a wide enough space in front of the loudspeakers as to not limit the sound quality and performance.
Selecting the installation location
The Focus XD loudspeakers do not require special positioning, though the quality of the individual loudspeakers’ sound is affected by the acoustic properties of the room. Since rooms are shaped uniquely, the positioning of the loudspeakers results in totally different behaviour. For example, large rooms without much furniture and many clean, hard wall surfaces can give a bright and diffuse sound with diverse echoing frequencies. A room with thick carpet, curtains and soft furniture surfaces will give a slightly warmer, darker and less lively sound.
The following information steps are therefore general directions that will make correct positioning easier to achieve. Furthermore, we recommend taking advantage of the services provided by your Dynaudio distributor to fully exploit the sound potential of your loudspeakers in your own listening room.
Right and left loudspeaker
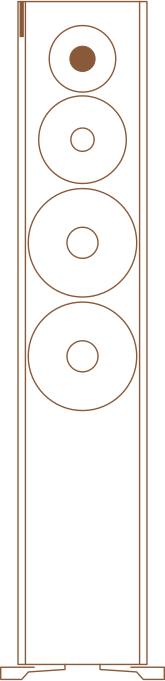
The outside of the left and right loudspeakers is different, with a different arrangement of the display (see figure above) and labelling on the rear side.
- Position the loudspeakers in the desired location.
Distance to walls
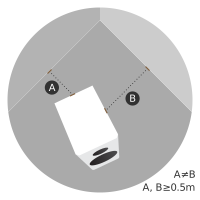
Every loudspeaker not only disperses sound energy directly into the room, but also to the side and even backwards. As a result, time-delayed reflections occur and add to the original music signal. Thus, when loudspeakers are positioned too close to walls, the sound quality can be restricted. Focus XD loudspeakers were developed to be placed free-standing, and therefore they reach their optimum performance when positioned as clear of any walls as possible.
- To reduce possible influences from the back and sidewalls, the distance to these boundaries should ideally not be less than 0.5 meter.
- Adjust the sound of your loudspeakers.
Distance to the listening position

- The distance between each loudspeaker and your listening position should be the same (B). Try to achieve an isosceles triangle.
- The distance between the loudspeakers should be the same or, preferably, slightly less than the distance between each loudspeaker and your listening position (A, B).
- The closer the listening position is in relation to the loudspeakers, the closer the speakers can be positioned to each other.
- As a starting point, it is recommended that the speakers be about 2 meters apart from each other for the best results (A).
- If the speakers are positioned too close to each other, the stereo image will not seem realistic; if that distance is too wide, the image may leave an acoustic hole in the middle.
- Paying attention to the image during listening tests will help dictate optimum placement during experimentation and setup.
Loudspeaker toe-in
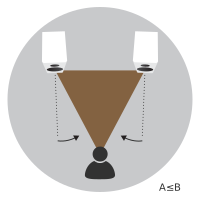
Depending on your personal listening environment and room dimensions, the loudspeakers may be angled in towards the listening area to focus the sound radiation. This positioning will typically improve imaging and is especially recommended by Dynaudio. However, you are free to select the precise position based on your personal listening habits.
Grille
A cloth grille is included and can be affixed to the cabinet to help protect the drivers from dust and any other influences. The grille is acoustically optimised, but the highest sound quality levels will be attained without any grille covers in place during listening.
If a front grille is used, it is held on the front of the housing by means of magnets.
Removing and attaching the front grille:
- To remove the grille, gently pull the grille at all corners straight away from the front.
- To fit the grille, line it up exactly in front of the housing with the logo facing upwards and carefully push the cover onto the loudspeaker.
Connections and control elements

This section describes the connections and control elements for the components. Please contact your Dynaudio distributor if you have any problems with connection and start-up. Distributor addresses can be found on the Internet at dynaudio.com. The active loudspeakers have an integrated amplifier and can be controlled with the remote control.
Connections and control elements Overview
Digital Audio
Digital connection. IN = input, OUT = output
Analog Audio
Analog connection. IN = input, Input sensitivity = manual correction of the input sensitivity (+6 / 0 / -6 dB)
Service
USB port for firmware update
Speaker Position
Sound adjustment (depending on the position of the loudspeakers). Sound adjustment is performed with a rotary knob with 7 positions. With the 3 main positions, the rotary knob clicks into place:
Neutral = with free-standing placement. Wall = if placed near a wall. Corner = if placed in a corner
Treble
Treble adjustment (+1 / 0 / -1 dB)
Zone
Selecting the audio zone (Xeo hub operation)
Loudspeakers assigned to different zones can be controlled separately via the remote control.
The zones are identified as Red, Green, and Blue.
Channel Mode
Master = loudspeaker operated as master. Slave = loudspeaker operated as slave.
External = loudspeaker configured as active loudspeaker (at full performance)
Power
Power switch.
- I = The loudspeaker is on. The loudspeaker can be activated and deactivated via the remote control. If the loudspeaker is activated and there is no signal, it will switch to standby mode.
- O = The loudspeaker is completely off.
Mains socket

To connect the loudspeaker to the mains voltage.
Remote control
The remote control can be used to turn the loudspeakers on and off, change the volume, switch between digital and analog input, switch the display on or off, and select a hub and its connected signal sources.
MUTE
Muting the loudspeakers
Briefly pressing this button will mute or unmute the selected loudspeaker.
ON/OFF
Loudspeaker on/off
 = on
= on
 = switch to standby
VOLUME
Changing the volume
 = louder
 = quieter
DIRECT
Direct selection
 = toggle between digital and analog input
 = switch the display on/off
INPUT
1/2/3/4
Selecting the signal source
Selects one of the signal sources Line In, Optical In, Coax In or USB In from the active hub.
HUB
A/B/C
Selecting the Hub or Connect
Selects one of three possible Hubs or Connects A, B, or C.
Connecting the loudspeakers
- To connect the loudspeakers, switch all components off.
Connecting the digital signal source
You can connect your loudspeakers as follows:
- Both loudspeakers are connected using cables. This requires two digital cables but the systems benefits from signal processing of 24 bits/192 kHz.
- You only connect one loudspeaker using a cable; the connection between the loudspeakers is wireless. This requires one digital cable and provides signal processing capabilities of 24 bits/96 kHz.
- Both loudspeakers are operated wirelessly via a Dynaudio Hub or Connect box with signal processing of 24 bits/96kHz.
Connecting both loudspeakers with cables
- Connect the digital output for the signal source to the digital input (Digital Audio IN) on one loudspeaker. You can choose whether to use the right or left loudspeaker.
- Operate the connected loudspeaker as master by setting the Channel Mode switch on the rear side of the housing to Master.
- Connect the digital output on the master loudspeaker to the digital input (Digital Audio IN) on the other loudspeaker.
- Operate the loudspeaker connected in this step as slave by setting the Channel Mode switch on the rear side of the housing to Slave.
Connecting only one loudspeaker with a cable
- Connect the digital output for the signal source to the digital input (Digital Audio IN) on one loudspeaker. You can choose whether to use the right or left loudspeaker.
- Operate the connected loudspeaker as master by setting the Channel Mode switch on the rear side of the housing to Master.
- Operate the other loudspeaker as slave by setting the Channel Mode switch on the rear side of the housing to Slave.
Operating the loudspeakers via a Hub or Connect
Dynaudio’s innovative Connect system offers the option to operate the loudspeakers completely wirelessly. The connection to the loudspeakers is established by either a Dynaudio Hub or Connect box to which the analog and/or digital sources can be connected. For more details, please refer to the Connect Owner’s Manual.
- Install and configure the Connect system according to the Connect owner’s manual.
- On the rear side of the housing, select the red, green, or blue zone. Loudspeakers that belong to a common zone can be operated together using the remote control.
- Operate one loudspeaker as master and the other as slave by setting the respective switch (Channel Mode) correspondingly on the rear side of the housing. The assignment of master and slave is irrelevant.
Connecting the analog signal source
The loudspeakers can also output signals from an analog signal source. The signal source is connected to the analog inputs.
- Connect the left analog output from the signal source to the analog input (Analog Audio IN) on the left loudspeaker.
- Connect the right analog output from the signal source to the analog input (Analog Audio IN) on the right loudspeaker.
- Operate one loudspeaker as master and the other as slave by setting the respective switch (Channel Mode) correspondingly on the rear side of the housing. The assignment of master and slave is irrelevant.
Operating the loudspeakers without controlling the volume
You can also operate the loudspeakers without controlling the volume yourself. The amplifiers integrated into the loudspeakers function as a power amplifier; volume is controlled via the source signal (e.g. pre-amplifier).
- Connect the left analog output from the signal source to the analog input (Analog Audio IN) on the left loudspeaker.
- Connect the right analog output from the signal source to the analog input (Analog Audio IN) on the right loudspeaker.
- Set the Channel Mode switch on the back side of the housing to External.
High sound pressure levels
In the External operating mode, signals are amplified at the maximum. Connecting a signal source with an uncontrolled or maximum level can harm your hearing and cause damage to the components.
- Only connect controllable signal sources.
- Before switching on the loudspeakers, turn down the volume for the signal source using its volume control.
Adjusting the loudspeakers’ sound
The sound of Focus XD loudspeakers can be adjusted by increasing or lowering high and low frequencies. Each loudspeaker can be set separately and individually based on the room conditions and personal listening preferences.
Adjusting the low-frequency range
The Speaker Position rotary knob allows you to lower low frequencies. This allows you to balance out elevated or cancelled-out low-frequency signal portions, as they often occur in living spaces.
Set the Speaker Position rotary knob to the desired position on the back side of the housing for each loudspeaker. There are 2 additional intermediate stages between each of the main positions that click into place (Neutral, Wall, and Corner).
- Neutral: free-standing loudspeaker (no change to sound).
- Wall: if placed near a wall.
- Corner: if placed in a corner.
Adjusting the treble
Using the Treble switch on the rear side of the housing allows you to adjust the character of the sound to your listening preferences.
Set the Treble switch on the rear side of the housing to one of three settings:
- +1 dB: Increase, creates a somewhat brighter sound.
- 0 dB: Neutral position, no change.
- -1 dB: Lowering, creates a somewhat warmer sound.
Connecting the voltage supply
- Use the supplied power cable to connect the loudspeakers to the mains voltage and switch it on using the power switch (POWER) on the rear (position I).
Switching on/standby mode
To switch the loudspeaker on from standby mode:
- Point the remote control at the loudspeaker and press the ON button. The loudspeaker will automatically search for an audio signal or an active hub. If found, the signal will be output. If there is no input signal, the loudspeaker will go into standby mode after a certain period.
- To switch it back on, press ON or start music playback.
To switch a loudspeaker out of operation to standby mode:
- Point the remote control at the loudspeaker and press the OFF button. The loudspeaker will go into standby mode. To completely switch off the loudspeaker, turn the POWER switch on the rear to „O“. However, the loudspeaker can then no longer be switched on via the remote control.
Note
Before connecting the device, check whether the mains voltage listed on the rear side of the speakers matches that present at the installation site.
LED Display
Selecting inputs on the loudspeakers
- Press the DIRECT button on the remote control. The loudspeakers toggle between the analog and digital input if the corresponding signal sources are connected.
Selecting the Hub or Connect inputs
Optionally, the loudspeakers can also be operated with a Dynaudio Hub or Connect box. For details on operation via Hub or Connect, please refer to the Connect Owner’s Manual.
Selecting a Hub or Connect (HUB)
- Press HUB A, B, or C on the remote control. The chosen Hub or Connect is selected as the signal source.
Selecting an input on the Hub or Connect (INPUT)
- Press INPUT 1, 2, 3, or 4 on the remote control. The selected signal source will be played back.
Night Mode
- Briefly pressing the MOON button on the remote control will activate Night Mode. When in Night Mode, the status LEDs will only be lit up when the speaker is receiving commands from the remote control. After a few seconds, the LEDs will turn off. Press the MOON button again to disengage Night Mode.
Fixed Volume
- Press and hold the MUTE button to set the volume to a fixed, high level. To disengage the Fixed Volume mode, simply change the volume level using the Volume +/- buttons on the remote.
Disabling/Enabling Autosense
- In normal operation, the Focus XD will go to stand-by if it does not sense an incoming signal. Hold the ”Direct In” button on the remote for 5 seconds, to disable or enable Autosense. The status LED will blink once for enabling, and twice for disabling Autosense. Note that when Autosense is off, the speaker will remain On, until the user actively sets the speaker in Stand-By using the Off button.
Adjusting the volume
Change the volume by pressing the VOLUME buttons on the remote control.
- Press to turn the volume up.
- Press to turn the volume down.
Muting the loudspeakers
- Briefly pressing the MUTE button on the remote control will mute or unmute the selected loudspeaker.
Note
If loudspeakers are operated in hub mode in different zones, the volume is controlled separately. For details on operation via the Xeo hub, please see the Xeo owner’s manual.
Display
The display on the top edge of the housing indicates the operational state of the loudspeakers and system using LEDs with various colours and flash functions.
The display can be switched on or off with the button on the remote control.
LED Display
On-state

The bottom LED is illuminated in blue.
The loudspeaker is switched on and an audio signal connected to a Hub or Connect is played back.
The bottom LED is flashing in blue.
The loudspeaker is switched on, but an audio signal cannot be found on the selected input.
The bottom LED is illuminated in violet.
The loudspeaker is switched on and an audio signal connected to a local input is played back.
Off-state

The bottom LED is illuminated dimly in red.
The loudspeaker is in standby mode.
LED display meanings
Hub or Connect connection

The bottom LED is flashing red.
There is no active Hub or Connect, or no connection to a Hub or Connect possible
Switch-on process
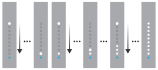
LEDs are illuminated one by one.
The loudspeaker is being switched on.
Switch-off process

The LEDs go out one by one.
In the final state, only one LED is illuminated dimly in red.
The loudspeaker is being switched off.
Displaying the direct input

One of the two LEDs flashes.
- LED 1 = digital INPUT
- LED 2 = analog INPUT
Displaying the selected Hub or Connect

One of the three LEDs flashes.
- LED 1 = HUB A
- LED 2 = HUB B
- LED 3 = HUB C
Displaying the input source

One of the four LEDs flashes.
- LED 1 = INPUT 1
- 2nd LED = INPUT 2
- 3rd LED = INPUT 3
- 4th LED = INPUT 4
Searching for an input

The blue LED flashes; the lights in the white LEDs move back and forth.
Searching for an active input on the hub
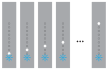
The blue LED flashes, the white LEDs briefly light in order.
A hub input has been selected and the hub is searching for an active input.
Volume, mute

A number of white LEDs are illuminated.
The number of LEDs indicates the selected volume.
The first LED flashes.
The loudspeaker is muted.
Firmware update
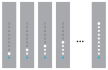
The white LEDs light in order.
A firmware update is being performed.
Updating the firmware
- Copy the firmware file onto an empty USB stick.
- Switch the loudspeaker off using the power switch on the rear of the device.
- Insert the USB stick in the USB port on the rear side of the housing.
- Switch the loudspeaker on (power switch on the rear of the device).
The firmware update is performed automatically.
The while LEDs will light in ascending order (see above).
The procedure is completed in just a few seconds. The loudspeaker enters standby mode automatically. - Switch the loudspeaker back off and remove the USB stick.
- Repeat steps 2 to 5 with the second loudspeaker.
Note
The firmware update must be performed separately for each loudspeaker.
Technical Data
| Loudspeakers | Focus 20 XD | Focus 30 XD | Focus 60 XD |
|---|---|---|---|
| Frequency range (± 3 dB) | 39 Hz – 24 kHz | 29 Hz – 24 kHz | 18 Hz – 24 kHz |
| Power consumption during operation | 18 – 200 W | 18 – 200 W | 18 – 200 W |
| Power consumption in standby | < 1 W (with active network) | < 1 W (with active network) | < 1 W (with active network) |
| Amplifier performance | Subwoofer: 150 W Tweeter: 150 W |
Subwoofer: 150 W Midrange: 150 W Tweeter: 150 W |
Subwoofer 1: 150 W Subwoofer 2: 150 W Midrange: 150 W Tweeter: 150 W |
| Dimensions (H x W x D) | 360 x 198 x 307 mm | 980 x 198 x 307 mm | 1095 x 213 x 337 mm |
| Weight | 8.65 kg | 18.5 kg | 27 kg |
| Voltage supply | 100 – 120 V/220 – 240 V 50/60 Hz |
100 – 120 V/220 – 240 V 50/60 Hz |
100 – 120 V/220 – 240 V 50/60 Hz |
Inputs
- Digital audio IN (16 / 24 bit: 44.1 / 48 / 88.2 / 96 / 176.4 / 192 kHz), cinch, SPDIF (75 ohm coax)
- Digital audio OUT (16 / 24 bit: 44.1 / 48 / 88.2 / 96 / 176.4 / 192 kHz), cinch, SPDIF (75 ohm coax)
- Analog audio IN (input sensitivity: +6 dB / 0 dB / -6 dB), cinch, 1 / 2 / 4 Vrms
- Service, USB, firmware upload
- Wireless – Bit rates: 6 / 48 and 24 / 96 bit
- Wireless – Frequencies: 2.4 / 5.2 / 5.8 GHz
Care and maintenance
Dynaudio loudspeakers require no special treatment apart from the kind of careful handling you would normally apply to any high-tech product in your home.
Aggressive cleaning fluids
All-in-one cleaning agents, aggressive cleaning fluids or special furniture polishes may damage the cabinet surface or other speaker parts.
- Use a soft dry or slightly damp cloth when cleaning the cabinet and other plain parts.
Cleaning the loudspeakers
- Switch off all components of your system when cleaning any of these components or in case of extended absences.
- Avoid touching the tweeter domes as any change of their shape may have an impact on sound quality.
- Clean the cabinet and other plain parts with a soft dry or slightly damp cloth only.
- Remove dust on the woofer diaphragms with a fine furniture brush.
All materials used by Dynaudio are integrated with exceptional care. By taking care of your loudspeakers, you will preserve the finish and build quality for a very long time.
Warranty
The warranty is based on the statutory regulations of the respective country.
Furthermore, Dynaudio offers an extended warranty after registration online at www.dynaudio.com/register.
Please refer to the information during registration for warranty periods.
This warranty only covers faults or defects in material and production. Damage caused as a result of abuse, misuse or defective electronics is not covered by the warranty. All warranty claims must be accompanied by a copy of the original purchase invoice and warranties are only valid in the country or market of original origin or distribution. Should warranty service be required, it must be arranged for in the country of purchase by an authorized Dynaudio dealer.