Sub 3
Introduction
Dear music lover
Welcome to your new Dynaudio subwoofer.
We’ve been designing, engineering and creating speakers at our Denmark headquarters since 1977, and ever since we started we’ve been pouring advanced R&D technology into every model.
What comes out is audio reproduction at the highest level, making listening to even the most familiar recordings a new listening experience altogether. Our aim: to reproduce exactly what was happening in the studio at the time of the original recording.
In fact, we’re one of very few companies who can realize such concepts. That’s thanks to Dynaudio Labs, our in-house development and production facility.
It’s so advanced, in fact, that we’ve been given TS16949 certification.
Each loudspeaker is constructed and rigorously tested by our master-craftsmen to these incredibly demanding standards.
If you want to get the best possible performance from them (that’s why you bought Dynaudio in the first place, after all), take a look at the information on the following pages. By considering our tips and suggestions, you’ll be recreating what our engineers do in our testing rooms: extracting every ounce of detail and nuance in the music… and then enjoying every second of it.
We wish you many years of enjoyment with your new subwoofer.
Dynaudio
Important safety instructions
- Read these instructions.
- Keep these instructions.
- Heed all warnings.
- Follow all instructions.
- Do not use this apparatus near water.
- Clean only with dry cloth.
- Do not block any ventilation openings. Install in accordance with the manufacturer’s instructions.
- Do not install near any heat sources such as radiators, heat registers, stoves, or other apparatus (including amplifiers) that produce heat.
- Do not defeat the safety purpose of the polarized or grounding-type plug. A polarized plug has two blades with one wider than the other. A grounding type plug has two blades and a third grounding prong. The wide blade or the third prong are provided for your safety. If the provided plug does not fit into your outlet, consult an electrician for replacement of the obsolete outlet.
- Protect the power cord from being walked on or pinched particularly at plugs, convenience receptacles, and the point where they exit from the apparatus.
- Only use attachments/accessories specified by the manufacturer.
 Use only with the cart, stand, tripod, bracket, or table specified by the manufacturer, or sold with the apparatus. When a cart is used use caution when moving the cart/apparatus combination to avoid injury from tip-over.
- Unplug this apparatus during lightning storms or when unused for long periods of time.
- Refer all servicing to qualified service personnel. Servicing is required when the apparatus has been damaged in any way, such as power-supply cord or plug is damaged, liquid has been spilled or objects have fallen into the apparatus, the apparatus has been exposed to rain or moisture, does not operate normally, or has been dropped.
- WARNING: To reduce the risk of fire or electric shock, this apparatus should not be exposed to rain or moisture and objects filled with liquids, such as vases, should not be placed on this apparatus.
- To completely disconnect this equipment from the mains, disconnect the power supply cord plug from the receptacle. The mains plug of the power supply cord shall remain readily operable.

WARNING
Risk of Electric Shock. Do Not Open.
To reduce the risk of electric shock, do not remove the rear panel and do not expose the apparatus to rain or moisture. No user serviceable parts inside. Refer servicing to qualified personnel.
About this manual
Safety signs
In this operating manual following signs and symbols are used.
General safety sign
The exclamation point within an equilateral triangle is intended to alert the user to the presence of important operating and maintenance (servicing) instructions in the literature accompanying the product.

Dangerous voltage
The lightning flash with arrowhead symbol within an equilateral triangle is intended to alert the user to the presence of uninsulated “dangerous voltage” within the product’s enclosure that may be of sufficient magnitude to constitute a risk of electric shock to persons.
Signal words
NOTICE
Indicates in combination with a safety sign a hazardous situation which, if not avoided, will result in damage to equipment.
CAUTION
Indicates in combination with a safety sign a potentially hazardous situation which, if not avoided, could result in minor or moderate injury or damage to equipment.
WARNING
Indicates in combination with a safety sign a potentially hazardous situation which, if not avoided, could result in death or serious injury.
DANGER
Indicates in combination with a safety sign a hazardous situation which, if not avoided, will result in death or serious injury.
How this operating manual is structured
This operating manual is divided in three main chapters, in which you can find all the information needed to operate the Dynaudio Sub 3 successfully:
- Before operation: Learn all about unpacking and connecting the subwoofer. The controls and connections on the rear panel are also described here.
- Operation: In this chapter you will learn how to operate the subwoofer in general and how to position it properly for optimum performance.
- Optimizing settings/Troubleshooting: Here detailed explanations can be found how to optimize the settings in order to achieve the maximum sound quality.
Unpacking

To find the suitable position for the Sub 3 in your listening room, please read the chapter “Positioning the subwoofer”.
To unpack the subwoofer
Unpack the subwoofer on a clean, even and soft area; floor carpeting is very suitable.
The packaging should be opened from the top. Remove all accessories that come packed with the subwoofer. Do not remove the top part of the protective material.
With the protective material still in place but with accessories removed, carefully tilt the packaging on its side and tilt again to turn it upside-down. Ensure that no part of the top-cover is obstructing the opening at the top.
The outer packaging can now be lifted away from the subwoofer itself. Remove the protective material that now is on top. Through the bag you can now see the underside of the subwoofer.
Open the bag and remove such from around the base of the subwoofer.
Again, carefully tilt the subwoofer on its side and again to turn it onto its feet. Note that the top part of the protective material will now come off easily so ensure that the subwoofer does not drop or slide away in the process.
Check that the contents are complete
- Subwoofer: The factory-set power requirements (refer to label on rear of subwoofer) should correspond for the region where the subwoofer was purchased. Refer also to chapter “Important Safety Instructions”.
- Front baffle grille
- AC mains lead. The supplied lead should be suitable for the region where the subwoofer was purchased.
- Owners manual
Grille
The subwoofer can be operated without the grille. However, it is recommended that the grille is mounted during normal use to help prevent accidental damage or dirt settling on the cone of the loudspeaker. With subwoofers, the influence of the grille on the sound is virtually negligible.
To remove the grille:
- Gently pull the grille at all corners.
To fit the grille:
- Line up the studs with the corresponding front baffle holes.
- Gently push the grille in at all corners.
Note
Be careful when mounting the grille not to touch the cone of the loudspeaker itself.
Controls and connections

1. ON/OFF
Main power switch (to switch the subwoofer manually on and off). LED: shows operation mode:
- red = subwoofer switched on and in mute mode
- green = subwoofer is activated
2. AC IN
Main power input.
3. POWER
Subwoofer auto power mode:
- ON = Auto mode disabled (subwoofer is switched on permanently, when main power switch is set to ON).
- AUTO = Auto mode enabled (when main power switch is set to ON and a music signal is detected, the internal amplifier is activated automatically).
4. GAIN
Subwoofer volume level.
5. PHASE
Phase setting: phase can be set to 0° or 180°.
6. SUB Lowpass
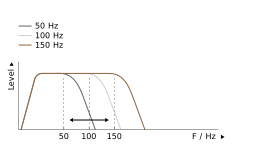
Subwoofer lowpass frequency: continuously variable from 50 to 150 Hz.
7. SAT Highpass
Allows cutting off low frequencies of the signal provided at the SAT Output:
- Flat = signal is not processed
- 60 = cut-off frequency at 60 Hz
- 80 = cut-off frequency at 80 Hz
8. SAT/SUB Input, SAT Output
- SAT/SUB Input: Input for full bandwidth signal from processor/receiver. This signal will be processed according to the SAT Highpass setting and provided at the SAT Output connection for satellite speakers to be connected.
- SAT Output: Output for satellite speakers to be connected. This signal is processed according to the SAT Highpass setting.
9. SUB I/O, To Slave
- LFE/Slave IN: input for LFE signal from processor/receiver. Note that the signal must be a true LFE signal or already have been filtered by the processor/receiver, as SUB Lowpass does not have an effect in combination with the LFE input.
- OUT: output to next subwoofer if installed.
10. LFE/Slave
Subwoofer operation mode LFE or Slave:
- LFE: setting if just one subwoofer is used or for first subwoofer if system consists of multiple subwoofers. Note that the SUB Lowpass control does not have an effect when the LFE Mode is selected.
- Slave: setting for second and all following subwoofers. Note that the SUB Lowpass, PHASE and GAIN controls do not have an effect when the Slave Mode is selected.
Operation
Connecting the subwoofer
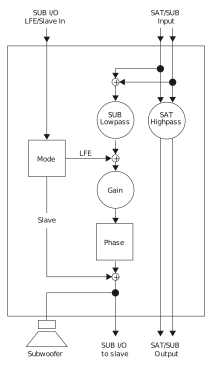
Subwoofer inputs
The Dynaudio Sub 3 provides two different signal inputs:
SUB I/O – LFE/Slave In
This input allows the LFE (Low Frequency Effect) channel to be connected, which is used in home cinema systems to reproduce low frequency effects.
The signal is:
- reproduced by the subwoofer
- routed to the SUB I/O – LFE/To Slave output for a second subwoofer to be connected.
The SUB Lowpass control has no impact on this input.
SAT/SUB Input
This input allows the connection of the full bandwidth signal from the processor/receiver (preamplifier out).
The signal is:
- reproduced by the subwoofer,
- routed to the SAT Output terminals. Low frequencies are cut-off according to the SAT Highpass setting,
- routed to the SUB I/O – LFE/To Slave output for a second subwoofer to be connected. High frequencies are cut-off according to the SUB Lowpass setting.
NOTICE
Damage of device due to improper connection
Set the mains power switch to OFF before connecting the Sub 3.
Only switch the subwoofer on (mains power switch to ON) after all connections and set up steps have been properly completed.
Note
All Sub 3 inputs and outputs are low level terminals. Thus, neither a power amplifier output must be connected to the subwoofer nor passive loudspeakers can be driven by the subwoofer directly!
Connecting a single subwoofer
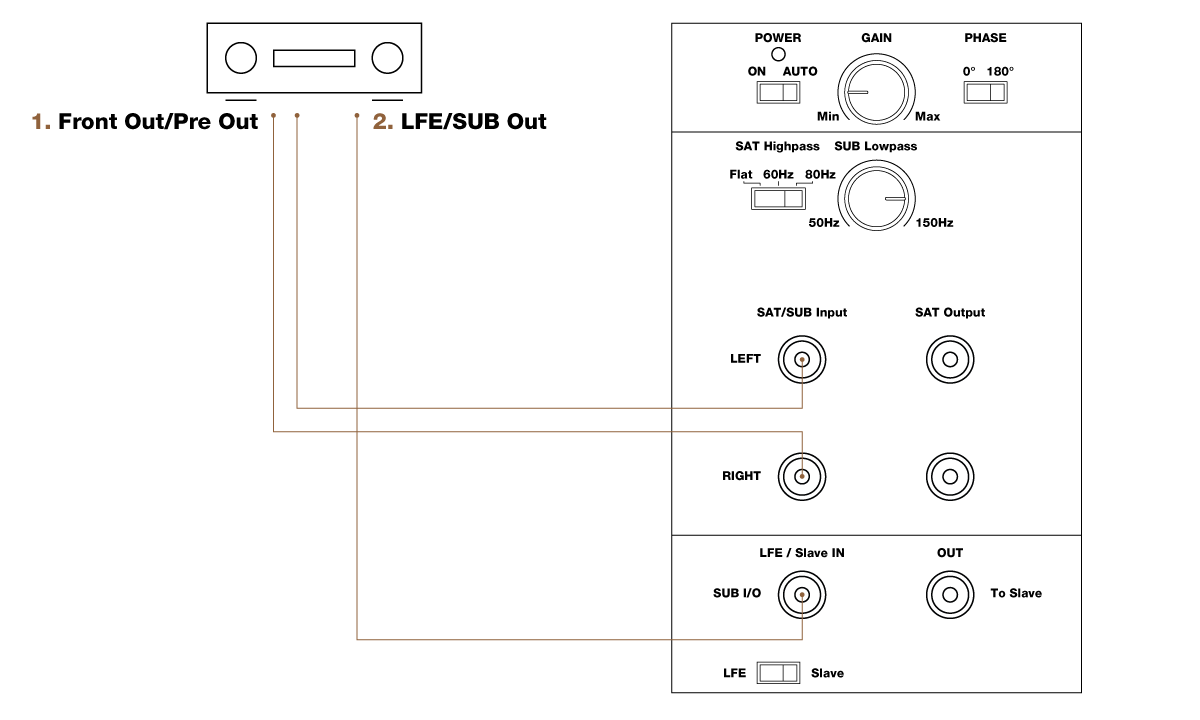
1. To connect the SAT/SUB input
- From the preamplifier output of your processor/receiver, PC or media player (often marked as Pre Out or Front Out) connect a stereo RCA cable to the subwoofer SAT/SUB Input.
This signal should not be already processed by the processor/receiver.
Please pay attention to the settings of your processor/receiver.
2. To connect the LFE channel:
- From the processor or receiver’s low-level (not a speaker output) subwoofer output (often marked as “subwoofer out”, “Sub out” or “LFE”), connect a mono RCA-to-RCA cable to the subwoofer input SUB I/O – LFE/Slave IN.
Please pay attention to the settings of your processor/receiver.
- Set the MODE switch to LFE.
Note
You also can use both connection types. Both signals will be combined in the Sub 3 and routed accordingly.
This allows the Sub 3 to reproduce both the LFE channel information as well as the bass range of the connected satellite speakers
Multiple subwoofer connections
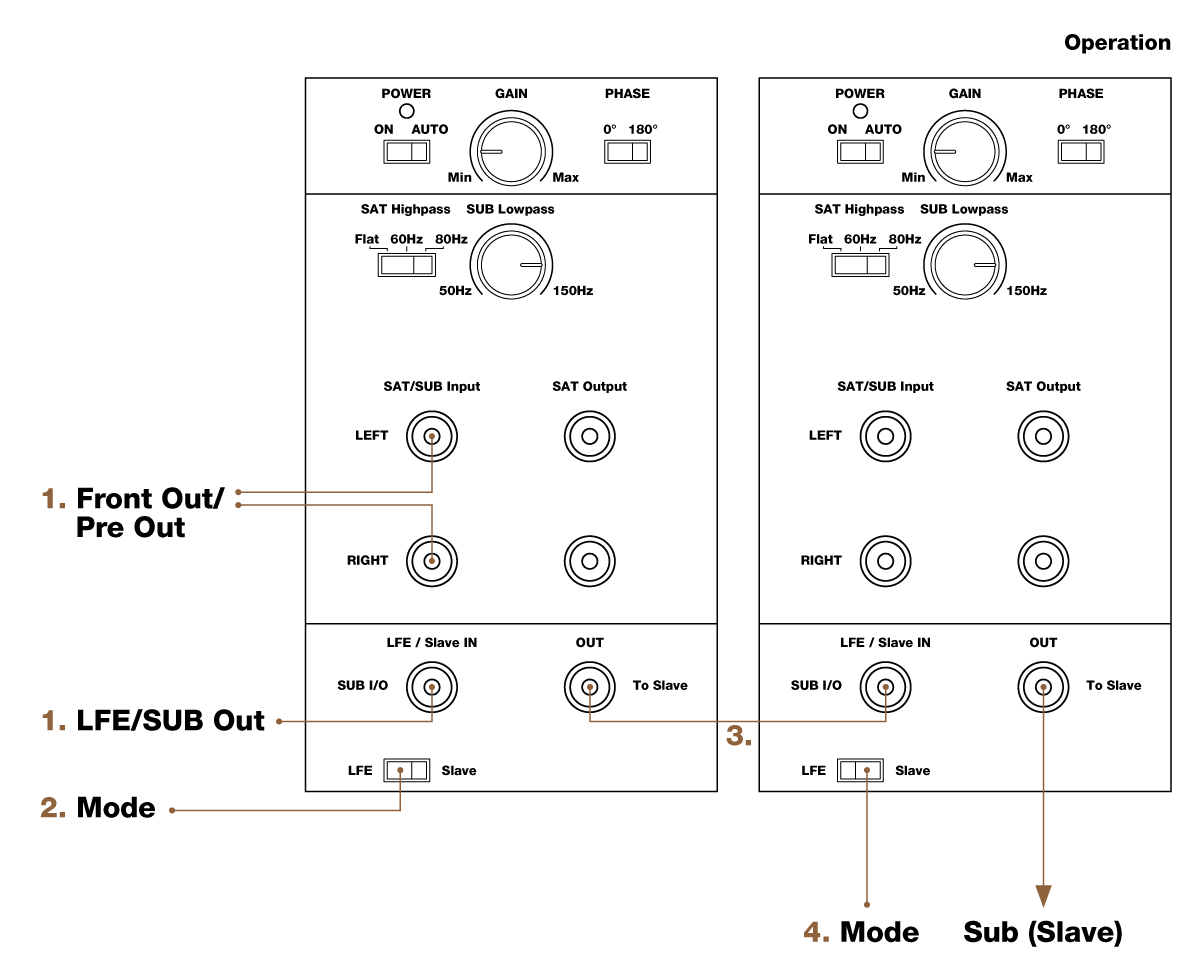
The Dynaudio Sub 3 can be used stand-alone or together with multiple subwoofer units. Using multiple units may be helpful if the listening room is quite large or has difficult acoustic conditions (e.g. room-modes, see also “Positioning the subwoofer” for further information).
When using two or more subwoofers, the first one (designated “Master”) controls the following subs (designated “Slave”) via a subwoofer cable.
To connect multiple subwoofers:
- Connect the first subwoofer with the processor/receiver as described before.
- Set MODE switch of first subwoofer to LFE.
- From the OUT – To Slave output of the first subwoofer connect a mono RCA-to-RCA cable to the SUB I/O – LFE/Slave IN input of the following subwoofer. This now becomes the slave.
- Set the MODE switch of the second subwoofer to Slave.
- Further subwoofers can be connected in the same way. Set the MODE switch of all following subwoofers to Slave respectively.
Note
In order to avoid interference and noise, we recommend you use quality, well shielded cables.
When using multiple subwoofers in a Master-Slave setup, it is recommended that the subwoofers are all the same model.
If you wish to use multiple subwoofers with full individual control, set the Input switch for all to the “LFE” position.
From the Amplifier, processor or receiver’s subwoofer output, use a Y-connector.
Connecting loudspeakers
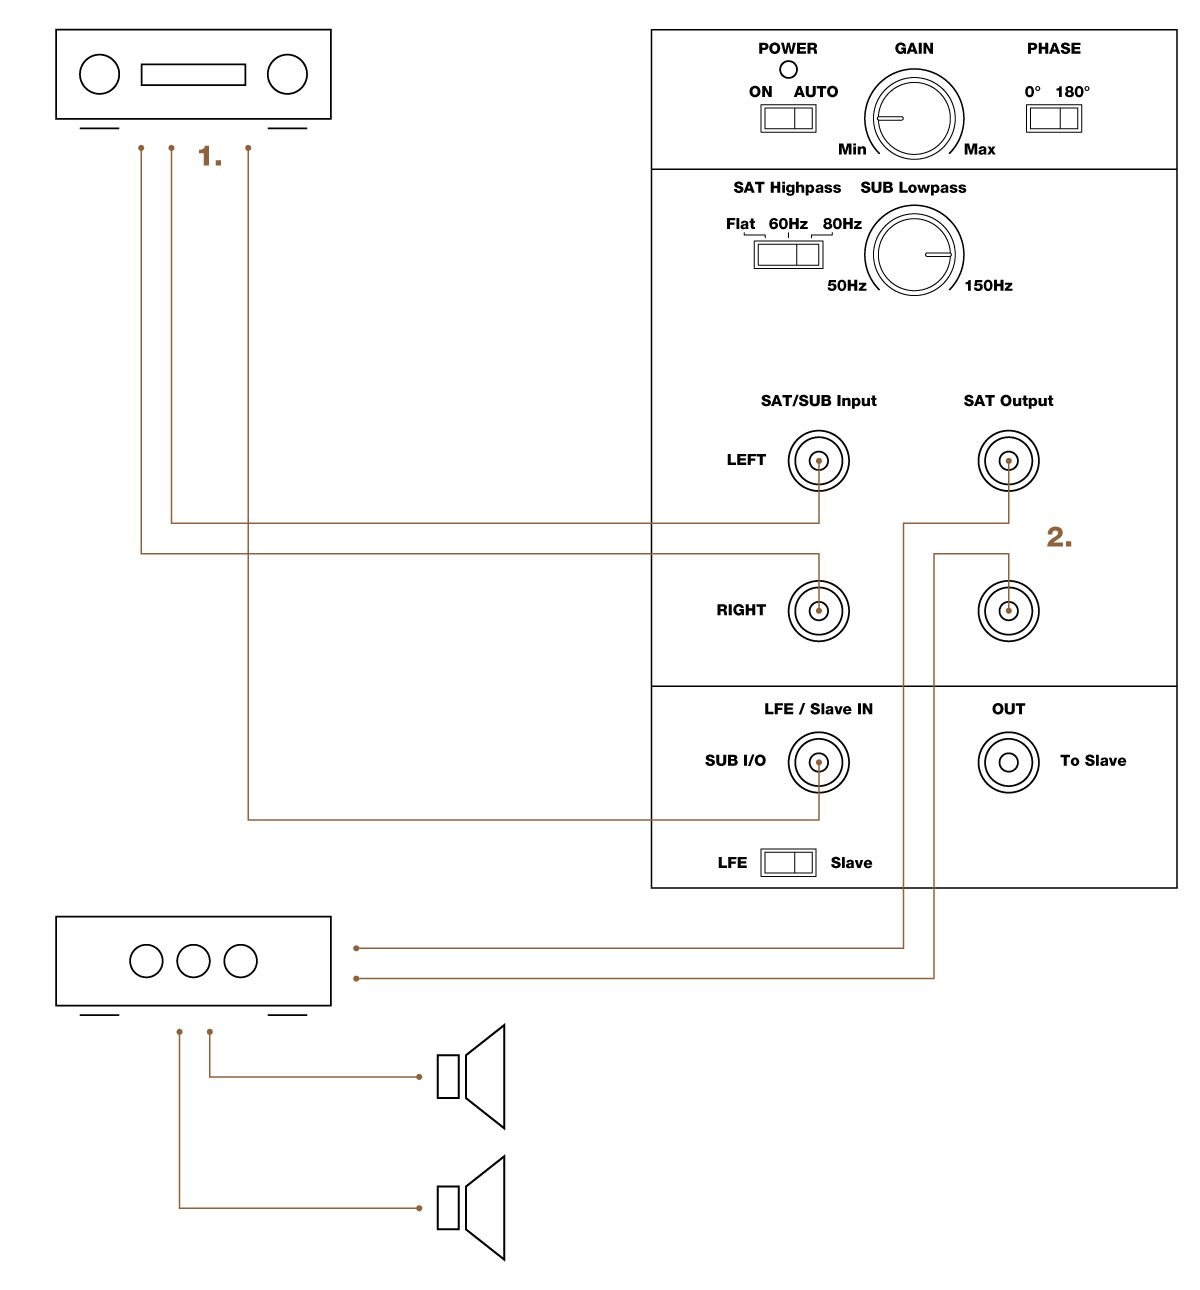
In home cinema systems the bass management – meaning the distribution of the low frequencies to the subwoofer and the speakers – is handled by the settings of the processor/receiver. If your equipment does not provide bass management, or if you want to use the Sub 3 together with a common stereo, the low frequency adjustment of the connected speakers can be managed by the Sub 3. This not only improves the sound by matching subwoofer and speakers, but also by freeing the power amplifier and connected speakers from the effects of sound-compromising bass reproduction. Also refer to the further explanations in the chapter “Connecting the subwoofer”.
To connect speakers:
- Connect the subwoofer with the processor/receiver as explained in “Connecting a single subwoofer”.
- From the Subwoofer SAT Output connect a RCA cable to the Main In of the power amplifier you use for your speakers.
Note
Stereos do not have a LFE channel. In this case just connect the front outputs of the processor/receiver (Front Out/Pre Out) with the subwoofer.
The signals connected to the SAT/SUB Input are provided at the OUT – To Slave output for connecting another subwoofer.
Switching the subwoofer on/off
Once you have ensured yourself that all necessary connections have been made, the subwoofer and the connected components can be switched on.
- Switch the subwoofer ON with the main POWER switch on the rear panel.
The status LED on the rear of the subwoofer will light up red.
Power mode
After switching on the Sub 3 the Power mode should be selected:
- ON: The amplifier is constantly on.
- AUTO: The Auto Power mode is enabled.
Auto Power mode
- When a music signal is detected, the internal amplifier is activated automatically. The status LED on the rear of the subwoofer will light up green. As long as a signal is available on the subwoofer’s input, it will remain switched on.
- After 15 to 20 minutes of not sensing any input signal, the subwoofer will switch itself to mute mode automatically. The status LED on the rear of the subwoofer will light up red.
Adjusting the volume (GAIN)
CAUTION
High Sound Levels
- To avoid auditory defects do not listen to high sound levels over a longer period of time.
The correct volume setting is an important aspect in achieving a well balanced speaker combination. Please also refer to “Specific tips” for further information or ask your local Dynaudio dealer for assistance.
- Adjust the GAIN control, until correct setting is reached.
Note
You can not adjust the volume, when subwoofer is in slave mode. In this case the volume is controlled by the setting of the master subwoofer.
Selecting the subwoofer cut-off frequency
(SUB Lowpass)
The SUB Lowpass control allows the frequency range of the subwoofer to be defined. Above the selected frequency the sound level decreases rapidly.
The correct setting of this cut-off frequency is important for a well balanced combination of subwoofer and speakers.
To select the cut-off frequency:
Set the SUB Lowpass control to the desired frequency between 50 and 150 Hz.
Note
In most audio-video-systems the subwoofer cut-off frequency is already set in the bass management of your processor/receiver. Please refer to the operating manual of your processor/receiver for further information. If possible, switch off any settings. If your processor/receiver does not allow to switch off the bass management, set it to the desired frequency and set SUB Lowpass to its maximum value (turn to the very right, 150 Hz).
- Please also heed the instructions given in the operating manual of your loudspeakers, and refer to “Cut-off frequencies” for further information.
Setting the phase
(Phase)
With the phase settings you can adjust the timing relationship between the subwoofer and main speakers. If either subwoofer or main speaker are slightly delayed in response in relation to the other, it can result in decreased bass output in the frequency response area where they overlap each other.The phase relationship between subwoofer and satellite speakers is very dependent on relative distance, construction and working principles of the main speakers. The figure on the left shows a case whereby phase of the subwoofer and main speakers are incorrect in the critical overlap area, thus significantly reducing acoustic output in the listening room in that area.
To find the correct phase setting:
- Play a bass-rich track which also covers the overlap area.
- Toggle the PHASE switch between 0° and 180°. Choose the setting for which you experience the most bass.
Setting the satellite cut-off frequency
(Highpass)
Depending on the bass capabilities of the speakers, the frequency range of subwoofer and speakers can overlap between 50 Hz and 150 Hz. A bump or a gap in the frequency response and thus a lower sound quality will be experienced if the system is not matched properly. In addition, small speakers and low powered amplifiers will particularly be affected by the low frequency signals, which again has an negative effect on the sound quality. Therefore it makes sense to limit the bass range of the connected speakers (called “satellites” in this case) by a highpass filter. The Dynaudio Sub 3 provides three settings to achieve this:
- Flat = no limitation
- 60 Hz = frequencies below 60 Hz are cut-off
- 80 Hz = frequencies below 80 Hz are cut-off
To set the cut-off frequency:
- Switch SAT Highpass control to needed position.
Note
In most audio-video-systems the satellite cut-off frequency is already set in the bass management of your processor/receiver. Please see the operating manual of your processor/receiver for further information.
You can decide whether you use the processor/receiver or the subwoofer for setting the cut-off frequency. Just take care, not to set it twice by setting either of them to Flat.
Positioning the subwoofer
Although it is often said that the location of a subwoofer in a listening room is not critical (as the human ear can not locate direction at very low frequencies), we recommend that you choose its position carefully. Thus the subwoofer can integrate seamlessly with the other speakers in the system and interact correctly with the room acoustics.
All of the following should be taken as rough guidelines; bass response in general is very dependent on the acoustics of the listening environment. Finding the best position often involves a lot of trial-and-error experimentation. Always trust your ears, even if the position of the subwoofer seemingly goes against the guidelines. Contradictory as it may seem, good integration of subwoofers has been achieved when one isn’t aware that a subwoofer is present at all in the system, yet performance involves fast, deep and solid bass without sounding stressed, even at loud levels.
Choose adequate music material
When experimenting to find the optimal location, use a couple of music tracks with repetitive bass across a large spectrum. The tracks should be sufficiently different from each other and each should cover a wide bass-range. Musical instruments, such as a double-bass, bass guitar, church organ, etc. cover a wide spectrum in the bass region and are therefore very suitable. Using non-music (such as action movies) material to position and adjust the subwoofer with, may lead to spectacular results with such material but almost always it will result in overblown and excessive bass when playing music with the same setting.
Impact of room-modes
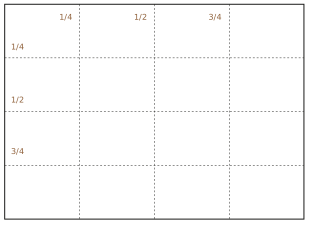
Every listening environment will have specific “room-modes”, whereby in some specific locations in the room and at particular frequencies, the bass may be too much or too lean. This effect will be stronger in square and “shoe-box” shaped rooms. With a single subwoofer, the better position for the subwoofer relative to the listening position will be the one where bass is perceived to be neither too much nor too lean at any given frequency.
- Avoid placing the subwoofer at 1/4, 1/2 or 3/4 of either the length or width of the room as at these locations the room-modes are likely to be strongest (the dashed lines in the figure)
Positioning possibilities
Moving the subwoofer closer to walls and corners in particular will generally increase the amount of bass. Although the extra amount of bass can be compensated for by reducing the volume level of the subwoofer relative to the rest of the system, this can result in uneven bass response at the listening position. You can try starting with placement in a corner and experiment by gradually moving it out of the corner or further away from the wall. Try to locate the position which yields the best compromise between position, volume and even bass response. Note that every time that you reposition the subwoofer (even if it’s over a short distance) you may need to adjust the level and phase settings again.
Corner placement
This placement yields maximum boost of bass level but potentially uneven distribution of bass in the room (room-modes), particularly if the room is square or shoe-box shaped.
- From the listening position, check if the bass is even across the entire bass spectrum. If not, move the subwoofer out of the corner. Try moving it along either wall.
Next to wall, away from corner
This position still provides considerable boost but less than the corner placement as above. Room-modes can also still be considerable but less so than with corner placement.
- From the listening position, check if the bass is even across the entire bass spectrum. If not, move the subwoofer away or towards your listening position until the most even response has been obtained.
- Avoid placing the subwoofer exactly half-way or at a quarter of the wall’s length.
Free standing, away from wall and corner
This position will give least boost compared to wall or corner placement, but in general offers the best flexibility at achieving most even bass distribution at the listening position.
- Avoid placing the subwoofer exactly half-way or at a quarter’s length of either sidewall.
- Particularly in smaller square or “shoe-box” shaped rooms the free standing position is recommended.
Using multiple subwoofers
By using carefully positioned multiple subwoofers it is possible to even out the different room-modes and thus create a more coherent overall bass response in the room. It is worth experimenting with different locations around the room for the additional subwoofers, even using the rear of the room. As adding subwoofers will not increase the effect of room-modes, even adding a subwoofer without much care or thought to positioning is likely to help even out room-modes.
General tips
Check it out
Try different subwoofer positions and settings, before you finally choose a setup.
Note down settings
When looking for the best subwoofer position in the room, note down the ideal setting you found for a position. When moving the subwoofer between two positions you will be able to set the subwoofer to the same configuration as found before.
Vary the listening music
When experimenting to find the optimal settings, use a couple of music tracks with repetitive bass across a large spectrum. The tracks should be sufficiently different from each other and each should cover a wide bass-range.
Musical instruments, such as a double-bass, bass guitar, church organ, etc. covering a wide spectrum in the bass region and above, are very suitable as these depend on accurately balanced subwoofers and main speakers.
Verify changes
Although in general it is best to make adjustments in the sequence outlined below, note that changing one setting may influence another. For example, finding the right setting for phase may result in having to decrease gain, even if this was set correctly before.
It is recommended that you double-check the previous settings before moving on to the next one. Obtaining the best integration of the subwoofers generally involves a considerable amount of repeated fine-tuning.
Volume (GAIN)
With the GAIN control you can adjust the relative volume level of the subwoofer to the main speakers of the system:
- Play the same track a couple of times, adjusting the level so that the instrument sounds homogeneous across its range.
If you find that at certain specific bass tones the response is either too loud (bloated sound) or soft (thin sound), it may be that you have to experiment further with the location of the subwoofer and/or the cross-over settings.
- Refer to the sections “Positioning the subwoofer” and “Cut-off frequencies” for further information.
Cut-off frequencies
Matching the frequency responses of subwoofer and speakers has an important impact on the overall sound quality, when integrating a subwoofer into a audio-video-system. In general a large, floor-standing speaker still has significant output in the deeper bass range, whereas a very small speaker will not be able to reproduce deep bass at all. In the first case a bump in the overlapping area will cause a louder or even bloated sound while in the second case an acoustic hole will be experienced.
The following figures visualize the possible results (please note that all curves are for illustration purposes and do not show exact filter characteristics).
Note
When using multiple subwoofers, ensure that the settings for cut-off frequency, phase and LF extension are identical. Use the LFE and Slave mode options to ensure that all subwoofers operate on the same settings (refer to chapter “Multiple subwoofer connections”).
Different acoustic loadings can be found within a listening room. Thus, balancing out modes may require different power levels.
Cross-over frequencies set correctly
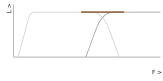
- L: Level
- F: Frequency
- Dark grey line: Main speakers
- Light grey line: Subwoofer
- Brown line: System response
Subwoofer and main speakers are perfectly matched, when the combined frequency response is smooth without bumps and gaps. A neutral sound will be the result.
Subwoofer too low, main speakers too high
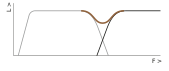
- L: Level
- F: Frequency
- Dark grey line: Main speakers
- Light grey line: Subwoofer
- Brown line: System response
A gap in the frequency response occurs, if the cut-off frequency of the subwoofer is set too low and of the main speakers too high (or if the main speakers are not able to reproduce low frequencies accordingly). In this acoustic hole you will miss some signal information and experience a thin bass sound.
Subwoofer too high, main speakers too low

- L: Level
- F: Frequency
- Dark grey line: Main speakers
- Light grey line: Subwoofer
- Brown line: System response
In the other case you will experience unnatural and bloated bass sound, if the overlapping area is too large. The combined frequency response shows a bump, as the sound pressure levels in this area are increased.
Control possibilities
The Dynaudio Sub 3 provides two controls to match the frequency response of the subwoofer and the main speakers perfectly:
- SUB Lowpass:
The upper cut-off frequency of the subwoofer, which can be continuously adjusted between 50 and 150 Hz. Above the selected cut-off frequency the sound pressure level decreases rapidly. - SAT Highpass:
The lower cut-off frequency of the main speakers; 60 Hz, 80 Hz or Flat (neutral) can be selected. Below the selected cut-off frequency the sound pressure level decreases rapidly.
Note
The settings for the cross-over frequencies just have an impact on the signal at the SAT/SUB Input! The LFE channel is just used to reproduce very low frequent effect signals. Consequently signals at the SUB I/O – LFE/Slave In are not limited in their frequency response.
General tips
- SUB Lowpass = 80 Hz
The cut-off frequency should be selected as low as possible. Then the subwoofer works without being recognized as a single signal source. Very often a cut-off frequency of 80 Hz has been experienced as an ideal value. - Reduce weak amplifiers and small speakers from bass load
By limiting the reproduction of low frequency at the SAT Output, amplifiers and speakers connected to this output are freed from reproducing the heavy bass load, which negatively impacts the sound quality. This will improve the overall sound of your audio system. - Play a music track that has a significant amount of bass over a large bass region. An instrument such as a double-bass or bass-guitar is very suitable. Listen carefully to the bass-line played by the instrument. As it goes up and down in the bass range, the overall bass volume should remain the same – be it with very deep or higher bass notes.
Specific tips
Many processors/receivers provide extensive bass management capabilities to set the cut-off frequencies for both subwoofer and speakers. If using the bass management of the processor/receiver, set the controls of the Sub 3 as follows:
- SUB Lowpass = 150 Hz
(at the very right) - SAT Highpass = Flat
CAUTION
Damage of small satellite speakers
Selecting the correct frequency depends to a large extend on the main speakers. Sometimes main speakers are specifically intended to work with a subwoofer. In such cases, the main speakers can get damaged by a full-range amplifier signal.
- If in doubt, check the instruction manual for the main speakers for any restrictions.
The table on the next page offers some setting tips for different speaker and amplifier combinations. This should only be taken as rough guidelines, as the best setup can just be found by experimenting.
Large speaker, powerful amplifier
Recommended first setting
- SUB Lowpass: 50 Hz
- SAT Highpass: Flat
Bass too bloated?
Decrease volume (GAIN), SAT Highpass = 60 Hz
Bass too weak?
Increase volume (GAIN), Increase SUB Lowpass step wise
Large speaker, weaker amplifier
- SUB Lowpass: 50 Hz
- SAT Highpass: 60 Hz
Bass too bloated?
Decrease volume (GAIN), SAT Highpass = 80 Hz
Bass too weak?
Increase volume (GAIN), Increase SUB Lowpass step wise
Medium sized speaker, powerful amplifier
- SUB Lowpass: 60 Hz
- SAT Highpass: Flat
Bass too bloated?
Decrease volume (GAIN), SAT Highpass = 60 Hz, 80 Hz
Bass too weak?
Increase volume (GAIN), Increase SUB Lowpass step wise
Medium sized speaker, weaker amplifier
- SUB Lowpass: 60 Hz
- SAT Highpass: 60 Hz
Bass too bloated?
Decrease volume (GAIN), SAT Highpass = 60 Hz, 80 Hz
Bass too weak?
Increase volume (GAIN), Increase SUB Lowpass step wise
Small speaker, powerful amplifier
- SUB Lowpass: 80 Hz
- SAT Highpass: 60 Hz
Bass too bloated?
Decrease volume (GAIN), SAT Highpass = 80 Hz
Bass too weak?
Increase volume (GAIN), Increase SUB Lowpass step wise
Small speaker, weaker amplifier
- SUB Lowpass: 80 Hz
- SAT Highpass: 80 Hz
Bass too bloated?
Decrease volume (GAIN), Decrease SUB Lowpass step wise
Bass too weak?
Increase volume (GAIN), Increase SUB Lowpass step wise
Very small speaker (Mini-satellites)
- SUB Lowpass: 100 Hz
- SAT Highpass: 80 Hz
Bass too bloated?
Decrease volume (GAIN), Decrease SUB Lowpass step wise
Bass too weak?
Increase volume (GAIN), Increase SUB Lowpass step wise
Troubleshooting
There may be various reasons why the subwoofer doesn’t function properly in a system without it being faulty. The checklist below will help solve problems you may encounter. Before consulting your Dynaudio dealer, check this list first.
Check this first:
- Check if all signal cables are connected properly.
- Check settings in bass management menu of the connected processor/receiver.
- Carefully and gradually increase the subwoofer volume level on the processor/receiver.
- Carefully and gradually increase the subwoofer volume level on the subwoofer GAIN control.
The subwoofer switches itself off although music is being played.
Cause
There is hardly any low-frequency signal available. This can happen if the music or movie itself does not contain very low frequencies (e.g. long dialogues).
Solution
- The subwoofer will switch on automatically as soon as low frequent signals are detected.
The subwoofer will not switch on at all.
- AC mains cable has become disconnected (LED does not lit).
- Mains switch on the rear is switched to OFF (LED does not lit).
Solution
Make sure to switch the system off first before making any changes!
- Reconnect mains cable.
- Switch mains back on.
- Check if all signal cables are connected properly.
The subwoofer will not switch on automatically.
- No signal is present on either of the subwoofer’s inputs (LED lights red).
Solution
Make sure to switch the system off first before making any changes!
- Check if all signal cables are connected properly.
- Check if the subwoofer output on the source is engaged.
Subwoofer is switched on but no sound from the subwoofer.
- No signal is present on either of the subwoofer’s inputs.
- In the processor or receiver’s bass-management set-up, subwoofer has been disabled.
- Subwoofer volume level has been turned down all the way on the processor/receiver.
- Subwoofer volume level has been turned down all the way with the subwoofer’s control.
Solution
Make sure to switch the system off first before making any changes!
- Check if all signal cables are connected properly.
- Check settings in Bass Management menu of the connected amplifier or receiver.
- Carefully and gradually increase the subwoofer volume level on the amplifier or receiver.
- Carefully and gradually increase the subwoofer volume level on the subwoofer GAIN control.
Care and maintenance
Components of the highest quality are used in your Sub 3. This assures years of trouble free operation. Following precautions should still be made though.
Recycling used products

This product is subjected to the European Union Waste Electrical and Electronic Equipment directive (WEEE), 2002/96/EC.
This product must not be disposed of as unsorted municipal waste but must be collected separately and disposed according to your national regulations.
Cleaning the cabinet
NOTICE
Damage of drive units
Touching the drive units may damage them.
- Do not touch the drive units by hand when cleaning the cabinet.
To clean the cabinet:
- The cabinet and other plain parts should be cleaned with a soft dry or slightly damp cloth.
- Use a moistened cloth or a mild detergent. Do not use aggressive cleaning solutions.
Changing the fuse
WARNING
Risk of Fire
- For continued protection against risk of fire, replace only with same type fuse and rating.
The fuse is placed on the rear of the subwoofer below the mains power input. It can be changed without removing the amplifier module.

To change the fuse:
- Switch off the mains power switch and unplug the power cable.
- Pull out the fuse holder.
- Replace fuse with same type and rating.
- Push fuse holder back firmly until it is locked in its position.
Warranty
The warranty only covers faults or defects in material and production. Damage caused as a result of abuse, misuse or defective associated electronics is not covered by the warranty.
All warranty claims must be accompanied by a copy of the original purchase invoice and warranties are only valid in the country or market of original origin and distribution. Should warranty service be required, it must be arranged for in the country of purchase by an authorized Dynaudio dealer.
For additional information about the Dynaudio warranty conditions please visit the Dynaudio website www.dynaudio.com.
Technical specifications
| Parameter | Value |
|---|---|
| System | Single driver, active subwoofer |
| Analog inputs | 1x RCA LFE, 2x RCA stereo |
| Analog outputs | 1x RCA Slave out, 2x RCA SAT out |
| Frequency response (±3 dB) | 22 - 175 Hz |
| Auto ON / OFF | Yes |
| Box principle | Sealed |
| High pass filter | Flat / 60 / 80 Hz |
| Low pass filter | 50 - 150 Hz |
| Phase adjustment | 0 / 180 degrees |
| Woofer | 24 cm MSP |
| Amplifier power | 300 W |
| AC power input | 100-120 V / 200-240 V 50/60 Hz |
| Standby power consumption | < 0.5 W |
| Maximum power consumption | 350 W |
| Weight | 10.5 kg 23.1 lb |
| Dimensions (W x H x D) | 266 x 276 x 320 mm |
| Dimensions with feet / grille (W x H x D) | 266 x 276 x 336 mm |