BM6A
Introduction
Congratulations on your purchase of the Dynaudio BM6A monitor. With the right care and attention it will give you many years of trouble free audio reproduction. It is most important, however, that you take a few minutes at this early stage in your BM6A’s life to read the safety instructions. They contain essential information to enable you to get the best from your monitors.
Important safety instructions
- Read these instructions.
- Keep these instructions.
- Heed all warning.
- Follow all instructions
- Do not use this apparatus near water.
- Clean only with dry cloth.
- Do not block any ventilation openings. Install in accordance with manufacturer’s instructions.
- Do not install near any heat sources such as radiators, heat registers, stoves, or other apparatus (including amplifiers) that produce heat.
- Do not defeat the safety purpose of the polarized or grounding-type plug. A polarized plug has two blades with one wider than the other. A grounding type plug has two blades and a third grounding prong. The wide blade or the third prong are provided for your safety. If the provided plug does not fit into your outlet, consult an electrician for replacement of the obsolete outlet.
- Protect the power cord from being walked on or pinched particularly at plugs, convenience receptacles, and the point where they exit from the apparatus.
- Only use attachments/accessories specified by the manufacturer.
- Use only with the cart, stand, tripod, bracket, or table specified by the manufacturer, or sold with the apparatus. When a cart is used, use caution when moving the cart/apparatus combination to avoid injury from tip-over.
- Unplug this apparatus during lighting storms or when unused for long periods of time.
- Refer all servicing to qualified service personnel. Servicing is required when the apparatus has been damaged in any way, such as power-supply cord or plug is damaged, liquid has been spilled or object have fallen into the apparatus, the apparatus has been exposed to rain or moisture, does not operate normally, or has been dropped.
WARNING:
To reduce the risk of fire or electric shock, do not expose this apparatus to rain or moisture.
The apparatus shall not be exposed to dripping or splashing and that no objects filled with liquids, such as vases, shall be placed on the apparatus.
An appliance coupler is used as the disconnect device, the disconnect device shall remain readily operable.
This symbol is intended to alert the user to the presence of uninsulated dangerous voltage within the product’s enclosure that may be of sufficient magnitude to constitute risk of fire and electric shock.
This symbol is intended to alert the user of the presence of important operating and maintenance instructions in the literature accompanying this product.
Setting Up
Mains Power Connections
Mains power is applied via a fused IEC inlet. The unit must be earthed. The voltage selector switch is used to match the unit to the mains voltage in your territory. The mains fuse must be the correct value for the voltage selected. 115 V requires a T3.15A fuse while 230 V requires a T1.6A fuse. The “T” signifies a slow blow type fuse.
You must ensure that the correct voltage and fuse have been selected before switching the unit on.
Audio Connections
Audio input is via a female XLR connector. The input is electronically balanced with +ve on pin 2, -ve on pin 3 and ground on pin 1. If your signal source is unbalanced it is usual to connect the unused signal pin (i.e. Pin 3) to ground. This is normally done inside the connecting cable. For best results use only good quality screened cables and connectors.
Positioning
The BM6A is designed primarily as a “nearfield” monitor and would normally be positioned 1-3 m from the listener. It can be mounted on stands or on the meter bridge of the console (providing this is substantial enough). For best results, the speakers should be “aimed” at the listener in both vertical and horizontal planes.
In any situation ensure that there is adequate space for ventilation around the heatsink.
Operation
Controls
Level switch
This sets the input sensitivity of the unit. The +4 position is intended for professional use and means that full power is reached with an input level of +4dBm (balanced). The -10 position is intended for semi-professional or domestic use and means that full power is reached with an input level of -10dBm (unbalanced).
HF Trim
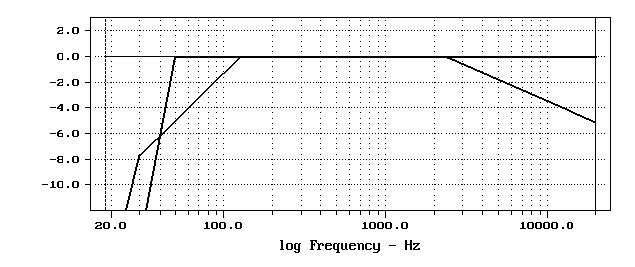
This control allows the high frequency level to be adjusted. The control works from 3kHz upwards and has a range of 5dB (see figure 1).
LF Trim
This control allows the low frequency level to be adjusted. The control works from 100 Hz downwards and has a range of 5dB (see figure 1). This section uses a special equalizer design which effectively swaps bandwidth for power. As you turn the LF trim level down the low frequency extension is improved.
The trim controls are intended to allow the user to make some adjustment of the speaker response to accommodate personal tastes and variations in acoustic environment.
Indicators
There are two LED indicators on the front baffle of the BM6A.
The right LED is the power/fault indicator. On switching the unit on this will shine red for about ten seconds and then turn green to indicate normal operation. If for any reason the amplifier protection circuitry is engaged the LED will turn back to red.
The left LED is a “true-clip” indicator and lights if the low frequency amplifier clips. It is acceptable to have this LED light up occasionally, but avoid running your system with this LED on most of the time.
Running in
The drivers in your BM6A must be run in before optimum performance is achieved. Avoid using the system at high levels for the first 24 hours of operation. Full run-in is usually achieved after about one week of normal operation.
Protection
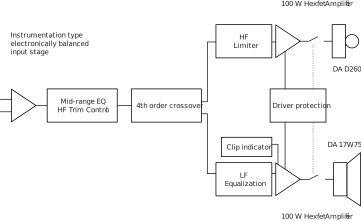
The BM6A has a comprehensive electronic protection system. Thermal overload or DC voltage on the outputs will cause the system to engage. This will disconnect the drive units from the amplifiers and change the power LED to its red/fault condition. In addition the HF amplifier has an optical limiter in circuit which prevents excessive long term power reaching the tweeter whilst allowing transients to pass uncompressed.
Miscellaneous
Troubleshooting
If the speaker stops working and the power LED turns red (fault condition) switch the mains power off and leave it for a moment. If the unit fails to operate again when you switch back on the fault may be due to overheating, switch off again and allow it to fully cool down before powering up. Ensure the heatsink is clear of obstruction and has free air circulation around it. If however the fault condition persists the unit should be inspected by qualified personnel.
If the speaker stops working and no LEDs are alight then the mains fuse on the back panel should be checked and replaced if necessary. If this does not rectify the problem the unit should be inspected by qualified personnel.
Care
Components of the highest quality are used in the BM6A and should ensure a long trouble-free life. Here are a few hints to help them on their way.
Avoid running the system into clipping or distortion. When an amplifier clips it can send potentially damaging DC components to the drive units. They may not fail at once but prolonged exposure to this will result in eventual failure.
If you need to switch off or unplug equipment connected to the monitor, turn off the monitor first. Large voltage spikes are often generated when equipment is switched off which will be amplified to a potentially damaging level.
Do not touch the drive units. The tweeter especially uses a very fine fabric diaphragm which is easily damaged.
Service
There are no user serviceable parts inside the BM6A so consult your dealer if service is required or contact one of the addresses below.
Dynaudio A/S
Sverigesvej 15
8660 Skanderborg
Denmark
Warranty
This product is guaranteed against defects in materials and workmanship for 1 year from date of purchase. This warranty is void if the unit has been tampered with or modified in any way, or in our opinion has not been used in accordance with the instructions above.
Technical Specifications
| Type | 2 way active nearfield monitor |
|---|---|
| Frequency Response | 42 Hz to 21 kHz (+/- 2.5dB) |
| SPL (Peak/Cont.) | 116dB / 101 dB one cabinet @ 1m |
| Drive units | 170 mm bass driver, 26 mm high frequency driver |
| Internal amplifiers | Dual 100 W discrete MOSFET power amps. Convection cooled. 2.2 kHz electronic crossover, 4th order phase aligned. Instrumentation type balanced input section, with input overload protection. |
| Protection | DC, Thermal on both channels, photo-active limiter on HF |
| User Controls | Variable HF and LF trim, Input sensitivity |
| Dimensions | 338 x 216 x 285 millimeters (H x W x D). (Allow 35 mm for rear connectors clearance). |
| Positioning | Free standing near field, desktop mounting. Rigid high performance stands recommended. |
| Accessories | Power cable supplied |
Schematic Diagram