EarthQuaker Devices ⋅ Avalanche Run ⋅ Product manual ⋅ English ⋅ 🇬🇧
Controls, jacks, and indicators
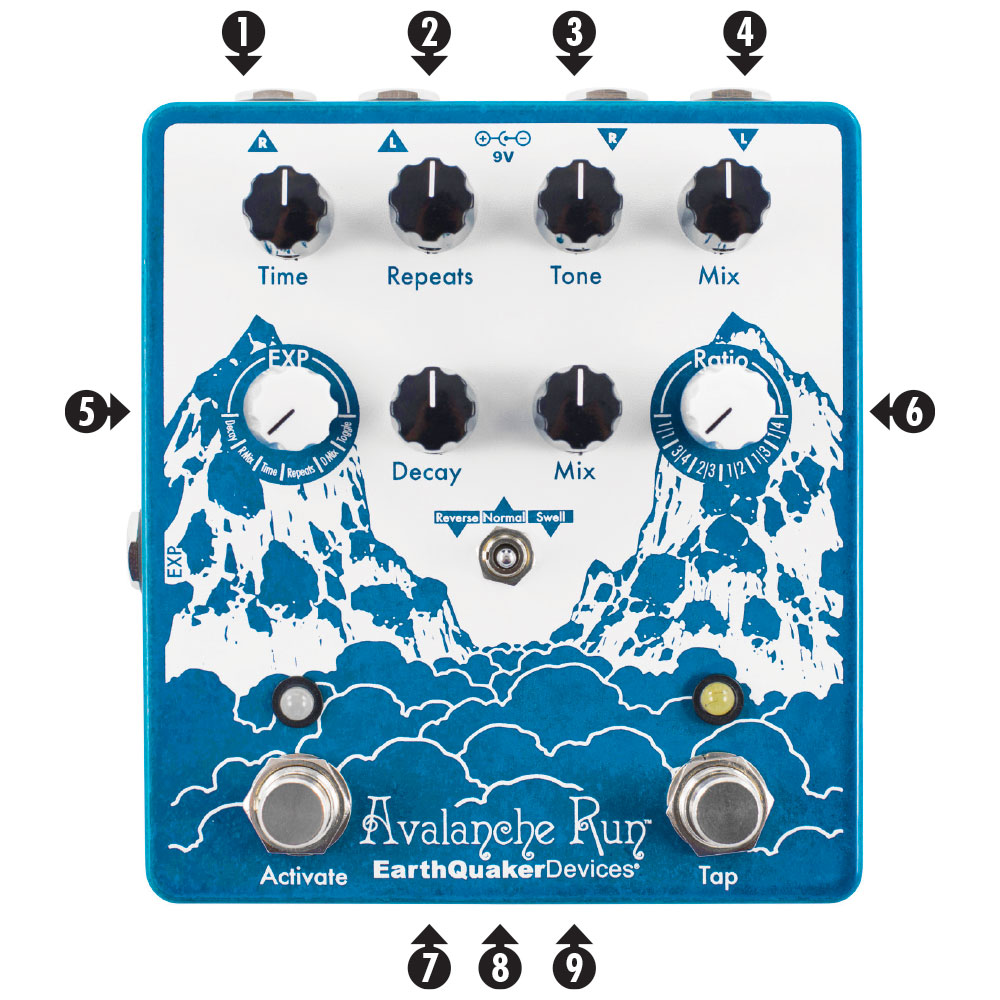
Top Row
- Time
-
Use the Time control to adjust the delay time. It goes from 0 ms to just under 2000 ms.
- Repeats
-
Use the Repeats control to adjust the regeneration of the delay, from zero repeats to near infinite.
- Tone
-
Use the Tone control to adjust the tone for the delay line only. Turn the control to the left to roll off high frequencies, turn it to the right to roll off low frequencies, and get a flat response in the middle.
- Mix
-
Use the Mix control to adjust the volume for the delay line. This blends in the effect signal with the dry signal until 1 o’clock. The 1 o’clock to 3 o’clock range boosts the effect signal over the dry signal, and from the 3 o’clock position, the dry signal is reduced until only the effect signal is left when the control is all the way up.
Bottom Row
- Exp
-
Use the Exp (expression jack assign) switch to map the expression jack to one of the assigned controls.
- Decay
-
Set the Exp switch to Decay to have the expression pedal control the reverb decay length.
- R Mix
-
Set the Exp switch to R Mix to have the expression pedal control the reverb mix.
- Time
-
Set the Exp switch to Time to have the expression pedal control the delay time. This is drastically different from the interface control. Using the expression pedal to control the time will give you all kinds of wild effects that cannot be achieved by turning the knob.
- Repeats
-
Set the Exp switch to Repeats to have the expression pedal control the delay repeats.
- D Mix
-
Set the Exp switch to D Mix to have the expression pedal control the delay mix.
- Toggle
-
Set the Exp switch to Toggle to have the expression pedal control the pedal mode, taking over from the toggle switch. In this mode, the pedal will crossfade from forward delay in heel-down position to reverse delay in toe-down position.
- Decay
-
Use the Decay control to adjust the decay length of the reverb. Short decay counterclockwise, long cavernous decay clockwise.
- Mix
-
Use the Mix control to adjust the volume for the reverb. This blends in the effect signal with the dry signal until 1 o’clock. The 1 o’clock to 3 o’clock range boosts the effect signal over the dry signal, and from the 3 o’clock position, the dry signal is reduced until only the effect signal is left when the control is all the way up.
- Ratio
-
Use the Ratio switch to select delay subdivisions when time is set using the Tap switch.
- 1/1
-
Quarter Note
- 3/4
-
Dotted 8th
- 2/3
-
Quarter Note Triplet
- 1/2
-
8th Note
- 1/3
-
8th Note Triplet
- 1/4
-
16th Note
Toggle Switch (Mode Selector)
- Normal
-
Set the mode selector to [Normal]notranslate} for the “standard” delay and reverb mode.
- Reverse
-
Set the mode selector to Reverse to activate reverse delay mode along with the “standard” reverb.
- Swell
-
Set the mode selector to Swell to activate volume swell mode.
Effect Mode Features
Normal mode
Both delay and reverb in standard forward mode.
Reverb is fully stereo and follows the delay in the signal path.
All controls work as displayed.
When using tap tempo to set the delay time, the repeats are cleared once a new time is tapped in.
Hold the Tap switch down to send delay into infinite repeats. On shorter Time settings, they will quickly go into oscillation and on longer Time settings, they will slowly build.
Reverse mode
Reverse delay, normal reverb.
Ratio is always in 1/1 position, no matter where the ratio switch is set.
Pro Tip: The other ratios will still work for standard delay. If you set the ratio for anything other than 1/1 when you are in Reverse mode, you will get really cool rhythmic patterns when using the Tap switch or expression pedal to switch between reverse and “normal” modes.
Hold down the Tap switch to temporarily send the delay back to forward mode and release the Tap switch to go back to Reverse.
Pro Tip: Use the expression pedal in the Toggle position to go back and forth from reverse to standard. This allows you to still use the Tap switch to send the delay into self-oscillation.
Swell mode
Swell mode adds an auto swell to the entire signal path – much like slowly turning up the volume control on your guitar.
Mix controls the length of the swell. The swell length becomes longer as you turn the control clockwise.
Swells are triggered by the input, regardless of input strength. To get the most from this effect, adjust your playing to a more staccato style and mute the strings after every note or chord.
This mode sums both left and right inputs on both the wet and dry paths to mono.
Hold the Tap switch down to send the delay into infinite repeats. On shorter Time settings, they will quickly go into oscillation. On longer Time settings, they will slowly build.
Tails Mode
The Avalanche Run also has a Tails mode. Tails mode allows the wet signal to naturally fade out after the effect is switched off. It has five tail length settings that are selected by the Ratio switch during power-up.
How to engage Tails mode:
Unplug the power cable.
Set the Ratio switch to the desired tail length:
- 1/4: true bypass (See “Return to True Bypass mode” below)
- 1/3: short effect tails
- 1/2: medium-length effect tails
- 2/3: long effect tails
- 3/4: User-defined: Tail length is determined by the Repeat control setting. Tails can go into oscillation by holding the Tap switch down, and tails can be stopped by double-tapping the Tap footswitch.
- 1/1: “Sound on Sound”: Tail length goes into infinite repeats once the effect is switched off. Tails can be stopped by double-tapping the Tap footswitch.
Once you have selected the tail length, hold down the Activate footswitch and plug in the power. The LED of the Activate footswitch will light up green after 2 seconds. Now release the Activate footswitch, and you’ll be in your desired Tails mode.
The signal is in buffered bypass mode when the LED is green.
The ratio switch will go back to selecting your desired Ratio after this process is complete.
Return to True Bypass mode
Unplug the power cable.
Set the Ratio switch to 1/4.
Hold the Activate footswitch and plug in the power. The LED of the Activate footswitch will light up red after 2 seconds, and you’ll be back in True Bypass mode.
Jacks & Signal Path
The audio jacks are located on the north side of the pedal, along with the (9V / 410 mA) power jack.
The Avalanche Run has a stereo analog dry path, a dual mono delay path and a stereo reverb.
To run this device in mono, use the left input and left output only.
To run stereo through, use both left and right inputs and outputs.
To run mono in and stereo out, use the left input and both left and right outputs.
Cool Trick: Plugging into the right input and using the left and right outputs will give you an all-effect left channel and a standard mixed right channel while the effect is engaged. You can create dramatic stereo effects by keeping Mix set low and turning up the amplifier source connected to the left output. The left output will not pass the dry signal when the effect is turned off in true bypass mode. But in tails mode, it will still produce the effected signal as long as it is set to decay.
The expression jack is located on the left side of the pedal. It is a TRS jack with the tip acting as the wiper.
We recommend using a Moog expression pedal with the output adjustment knob all the way up.
We cannot guarantee any other expression pedal to work with the Avalanche Run.
Power supply
For best results, please use the included 9V center-negative 1 amp DC power supply.
- Current Draw
-
410 mA
Flexi-Switch® Technology
This device features Flexi-Switch Technology! This relay-based, true bypass switching style allows you to simultaneously use momentary and latching-style switching.
- Standard latching operation
-
Tap the footswitch once to activate the effect and then tap again to bypass.
- Momentary operation
-
Hold the footswitch down for as long as you’d like to use the effect. Once you release the switch, the effect will be bypassed.
Since the switching is relay-based, it requires power to pass a signal.
Technical specifications
- Converters
-
24-bit 96 kHz A/D & D/A
- Typical signal-to-noise ratio
-
115 dB
- Input impedance
-
1 MΩ
- Output impedance
-
100 Ω
- Dry signal path
-
All analog
- Wet signal path
-
All digital with 20 Hz - 20 kHz Frequency response
Selectable relay-based true bypass or buffered analog tails modes
Technical specifications

- 57 mm

- 105 mm

- mm
↻ 2026-06-14